


Painting pumpkins is fun and easy. Although it’s messy and takes time, it also encourages creativity. The first step is to choose the type of pumpkin you want to paint. Once you’ve made your decision, you can use different colors to create various designs. Once you have the right color palette, you can add glitter, paint, or other decorative accents.
Painting pumpkins is easy
Once you have carved and cleaned your pumpkin, it’s time to paint. You can create many designs using paint and markers, and if you aren’t sure how to start, there are some simple steps you can follow to get the most creative results. Apply a coat of sealer to the pumpkin and allow it to dry completely before applying the next layer of paint. Then, trace the design with a pencil or use a permanent marker. After the design has dried, you can add embellishments and decorations.
Next, paint the pumpkin with a lighter color, a little lighter than the base color. If you want the pumpkin to appear darker, add shadows with dark brown paint. Also, use a pencil to mark the spot where the shadow will fall. This will help you create a more pronounced shadow line.
Once you have chosen a design, you can begin by painting the pumpkin with a 3-inch paintbrush. Allow the paint to dry completely, and apply a second coat if necessary. Once the pumpkin is dry, add highlights using a dry brush technique. Make sure the brush is dry before painting, as wet paint can damage the pumpkin.
Another fun Halloween design is to paint a pumpkin in the shape of a clown. This is a great way to make your pumpkins look spooky or frightening. The classic Halloween film, The Nightmare Before Christmas, is a great place to start. If you’re stuck for ideas, you can also paint pumpkins in the shape of characters from the film. Jack Skellington is one of the most recognizable characters from the film, and it’s easy to make your pumpkin look just like him.
It takes time
The process of painting pumpkins requires time and patience. The process starts with choosing a base color for the pumpkin and drying it completely before stenciling the design. Alternatively, you can use True Value EasyCare Premium Decor Spray Enamel, which dries quickly and allows for easy stenciling. This paint can be applied with a painting sponge, foam brush, or small paintbrush. After the first coat has dried, you can go back and add another accent color to achieve the desired effect.
Using acrylic paint allows you to create richer, more vibrant colors. It also adds layers to your painting and makes it appear raised on the surface. To get the best results, use a sponge brush instead of bristle-based paint brushes. This way, you will be able to avoid damaging the pumpkin’s skin and ensure that the paint is even and evenly distributed.
You can paint your pumpkin with many different designs. For example, you can paint the pumpkin with phrases, like “Happy Halloween,” or “Happy Fall!” You can even paint a face. The face can be any one you choose. If you want to make your pumpkin more personal, you can also draw a self-portrait on it.
Before you can begin painting, you’ll need to air-dry the pumpkin first. Once the pumpkin has been air-dried, you can paint it using various colors. Use the natural color of the pumpkin as your background color, or try using another solid color for a more colorful pumpkin. Use acrylic paint when painting the pumpkin, and test different colors on a small area of the pumpkin first.
It’s messy
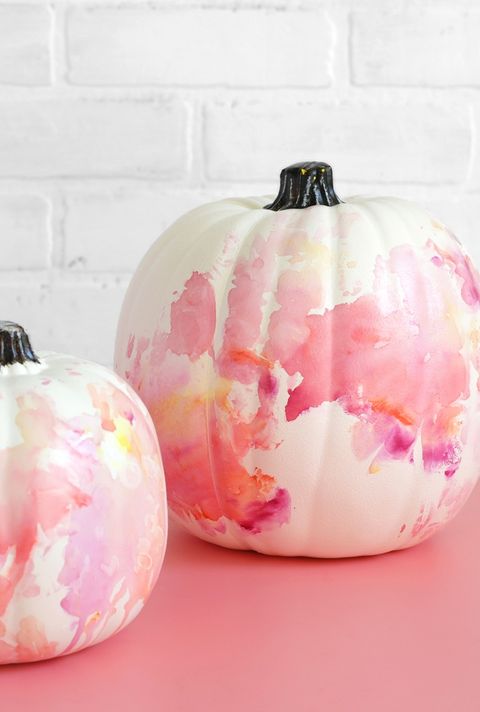
You can paint pumpkins with water-based household paint or acrylic paint. To avoid spills, you can use a plastic spoon to drizzle paint over the pumpkin. Start sparingly and add more if necessary. After the first coat of paint dries, you can add a second or third coat. If you want a marbled look, paint two different colors while the pumpkin is still wet.
Get your tools ready. First, you need a small pumpkin, several different colors of paint, and paintbrushes. You can also use a pencil or a large paintbrush to draw the outline of the face. If you’re not sure how to apply the paint, follow a video tutorial on YouTube.
You can also use a paintbrush to create drips on the pumpkin. Use a different colour for each drip. You can even use glitter to complete your design. For an easy, yet stylish look, don’t paint your pumpkins too heavily. Use multiple colors for different effects. If you’re feeling particularly ambitious, you can draw intricate patterns with paint pens.
Painting pumpkins is a great project for young children. You don’t need to purchase expensive supplies. Just prepare a flat, sturdy surface. Also, remember that you’re going to need a drop cloth or recycled newspaper to cover your workspace. Wear comfortable clothes as paints aren’t always easy to wash off of clothes. If you’re working with small children, you may find it easier to paint pumpkins with stencilled eyes and mouths.
It encourages creativity
When you’re looking for a fun way to encourage your child’s creativity, painting pumpkins is a great choice. The fun activity is easy to create and will allow your child to express his or her individuality. It’s also an excellent way to learn about color combinations and experimentation.
To get started, you should clean the pumpkin thoroughly. Ensure that all tools are put away and that it’s completely dry. Once the pumpkin is dry, clean and store carving tools in a safe place. Next, clean the surface of the pumpkin to serve as a fresh canvas. After cleaning, you can start painting by adding white paint and using bold, complementary colors.
Some students have taken pumpkin painting as a literacy activity. For example, a kindergarten class at Meadows Elementary School painted pumpkins in relation to a story book. Librarian Katrina Schoenrock provided students with tiny pumpkins and asked them to create a three-part art sequence. One group painted a pumpkin to look like a huge strawberry, while another group created a pumpkin to look like a dog.
Using paint pens is another fun option. These pens make it easier to apply paint to the pumpkin without having to worry about mess. You can also buy small squeeze bottles of acrylic paint that you can use to paint the pumpkin. They are also easy to dispose of after using them.
It lasts a long time
There are several tips to keep in mind when painting pumpkins so that your masterpiece will last for a long time. One of them is to prepare the pumpkin so that the paint sticks properly. You should start by wiping the pumpkin with soapy water, scrub away any dirt that might affect the paint, and then rub it dry. It is also a good idea to use a blow dryer to help speed up the drying process.
The next thing to keep in mind is that the pumpkin has a skin that acts as a protective layer. If you want to get the best seal possible, you need to let the pumpkin harden for a while. This can be done by putting it in a sunny window or in a greenhouse. This process can take several weeks to a month.
You should allow the pumpkin to completely dry before adding more layers of paint. It is also important to ensure that your design covers the entire pumpkin, and not just the front. If you’re not confident with your design, you can trace it with a pencil or permanent marker to ensure that you’re getting the correct shape. You can also add some embellishments to your pumpkin if you want to make it more beautiful.
If you’re planning on keeping your pumpkin indoors, make sure the color matches the decor inside your house. You can use various shades of blue and white for a coastal look, or go with metallic shades and all-black for a modern look. You can also use a paint pen to make detailed designs. For example, if you’d like to create a spider web design, trace a line halfway down the ridge of the pumpkin and connect the ridges using curved lines. A variety of acrylic pumpkin painting pens are available on Amazon.
It’s a great Halloween gift
If you’re looking for a fun way to decorate your home for Halloween, why not try painting pumpkins yourself? Painting a pumpkin is a great craft for kids and can even make a fun family project! Plus, painted pumpkins will last longer than carved pumpkins.
However, before you get started, there are a few things you should keep in mind. First of all, the material for your Paint For Painting Pumpkins is an important factor. You can also choose the size of the pumpkins. Choosing the right size will ensure that the pumpkins fit the recipient without being too small or too large.
If you’re looking for something a little more spooky, consider giving a skeleton hand book. This oversized tome has a motion-activated eye that glows a cool, eerie green. Another great Halloween gift idea is a Halloween-themed pillow. The cover is 100% polyester, making it easy to clean. Alternatively, you could give a Halloween gift set, complete with a 52-card deck and a monster tote bag.
A homemade soap in the shape of a scorpion is another fun gift idea for the Halloween season. You can also give a personalized bodysuit or onesie, which can say, “My First Halloween.” You could also add spooky graphics. A Halloween gift basket can contain a variety of Halloween-themed items, including Halloween-themed socks and pens.
Auto Amazon Links: Could not resolve the given unit type, . Please be sure to update the auto-insert definition if you have deleted the unit.

