Note: Use a little wood glue.
Take the other (non-pocket-holed) 1×8 boards and, on what will become the bottom side, drill two pocket holes on each short end, for a total of four pocket holes on these boards.
Pay attention to screw hole placement on the angle irons; the single-hole side should align with the front/back of your cart (not the sides) and should align with the bottom shelf boards.
Clamp into place with your right-angle clamp.
Be aware that you’ll need to rotate each of the irons to do the other angle side, so take care to measure correctly from the same end as before.


Materials you’ll need for this Industrial portable bar cart:
When the shelf is level, attach the first (front) screw of the second corner.
- Six (6) 1×8 pine or white boards, cut to 26” lengths
- Three (3) 1×3 pine or white boards, cut to 26” lengths
- Six (6) 1×3 pine or white boards, cut to 15-1/4” lengths
- Four (4) 1” aluminum angle iron, 36” lengths
- 1-1/4” kreg screws
- 3/4″ wood screws
- Four (4) casters
- 220-grit sandpaper
- Pocket hole plugs (optional)
- Rustoleum paint + primer spray paint in Flat Soft Iron
- Kreg right-angle clamp (optional but highly recommended)
- Stain/paint/finish of your choice (not shown)
- Kreg jig, impact drill screwdriver, power drill
The Step-by-Step for building your bart cart on wheels
Part 1: Drill the holes for the rustic bar cart

They’ll end up being about 7” apart.
Drill two pocket holes along each short end as well, about 2” from the sides. When you’re done with one board, you should have 12 pocket holes.

A DIY rolling bar cart is a perfect addition to any savvy, industrial-chic design. Today we guide you in a step-by-step instructional on how to make an industrial bar cart from stained wood, iron support beams, and wheels. In one afternoon you can create a gorgeous addition to your kitchen or living room.
Insert your pocket hole plugs into the back wall pocket holes.
In order to finish your shelves, you’re going to need to sand them smooth. Use fine-grit sandpaper (220-grit recommended).
When everything’s completely dry and thoroughly cured (the finish on your shelves as well as the paint on your angle irons), it’s time to assemble the modern bar cart.

Grab a can of spray paint in the metallic finish of your choice.
Next, take one of your shorter 1×3 boards and place it on your work surface.
Part 2: Create the main, horizontal shelves
You can buy cool bar carts online or in-store at big box retailers like Wayfair, Amazon, Target, or Walmart.
Use 1-1/4” screws to do this.
Position the long side of one of your shelves (pocket holes away from the 1×3) on the edge of the 1×3.

Remove right-angle clamp and screw into this pocket hole.
The post DIY Industrial Wood and Metal Rolling Bar Cart appeared first on Homedit.
Repeat this process, with the level and the single screws, then the double screw holes, for the third/top shelf.
However, the casters really make this unit more versatile – it can be a craft supply cart, a beverage cart, a dessert cart, a blanket cart…whatever you need
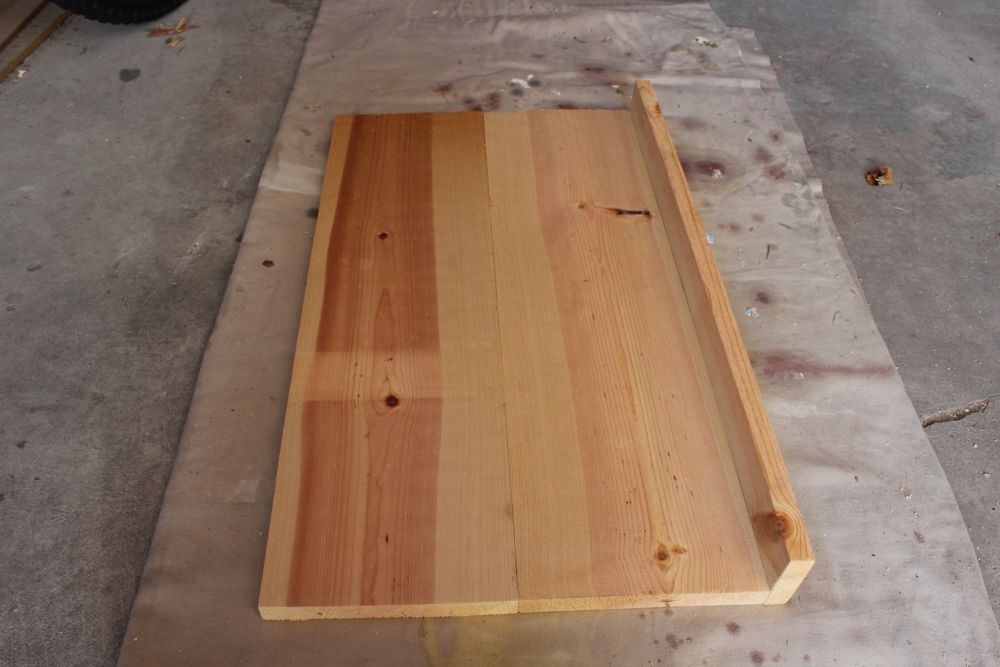
Determine, based upon knots and the appearance of the boards, the tops/bottoms of the shelves and also which sides of the boards will be the joints.
You’ll want two identical angle irons and two other mirror image angle irons (in other words, two sets of identical angle irons that are mirror images of each other).
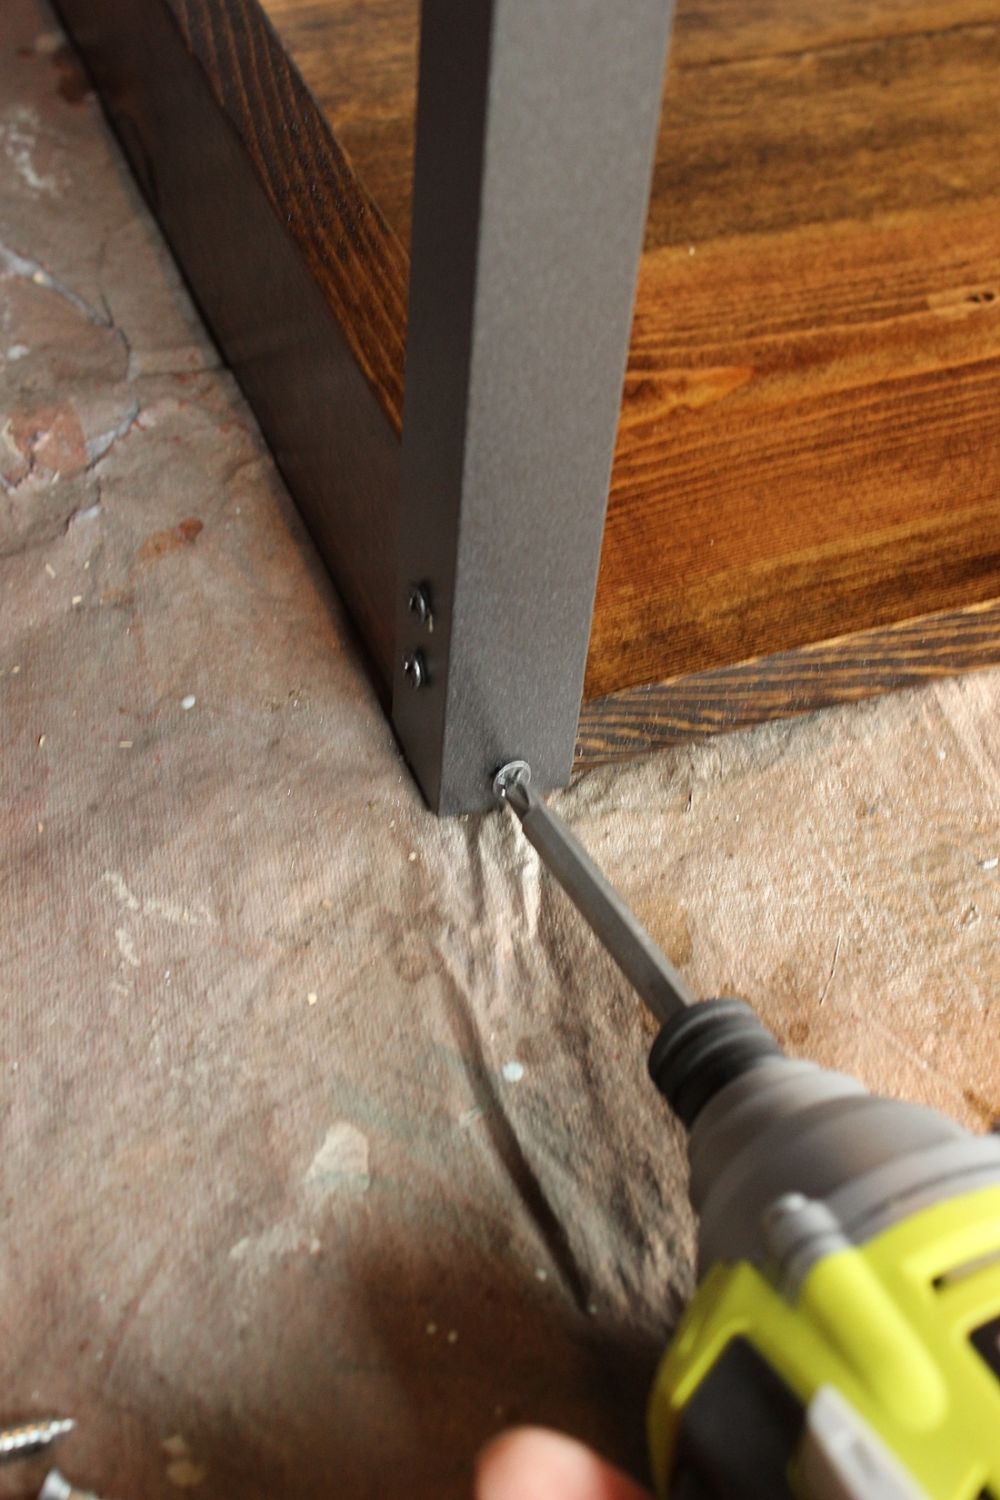
A simple wood drill bit worked fine for this because the aluminum was thin, although you can use a metal drill bit if you’d feel better about that.


While your shelf finish is drying, you can work on your rolling cart posts.

Part 3: Create Back Support For Shelves
Pair up six 1×8 pieces into three pairings of two-board shelves.
Of course, you can opt for no casters on your unit and create an industrial cart that’s still gorgeous and functional.
Repeat for other two longer 1×3 boards, for a total of three 1×3 boards with pocket holes.
Finally, place bar cart accessories! Decorate as you please
Begin by attaching the bottom shelf to the bottoms of your four angle irons.
This diy bar cart requires some simple materials, and a bit of handywork to turn out a timeless creation perfect for storing liquors, snacks, or books in one place.
Turn your shelf over. Repeat for other two shelves, for a total of three shelves.
It’s time to take these longer 1×3 boards anduse them to create the back shelf “wall” of each shelf.

Sand all surfaces of your shelves and walls.
Part 4: Add surrounding walls to shelves
In order to accomplish this quite easily, I simply clamped the four angle iron pieces to some scrap wood, aligning the ends precisely.

Wipe them clean and dry, then finish with the finish of your choice.


That wraps up our home bar cart tutorial! Now that you know the ways to make your very own mobile bar cart, we wish you luck and enjoyment in creating one!


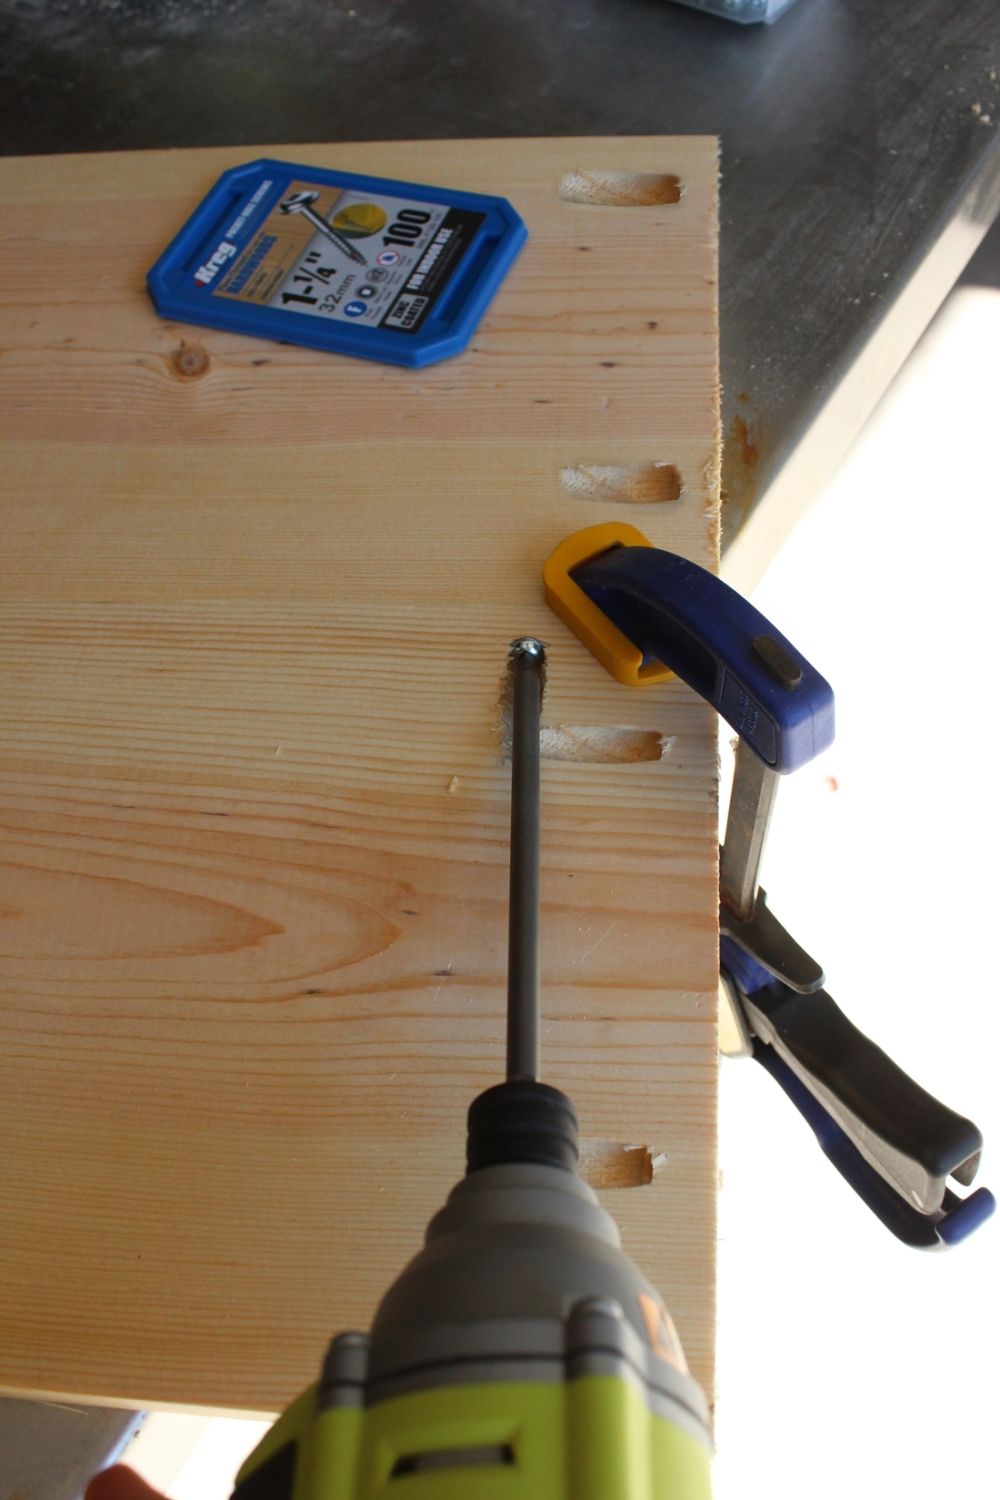
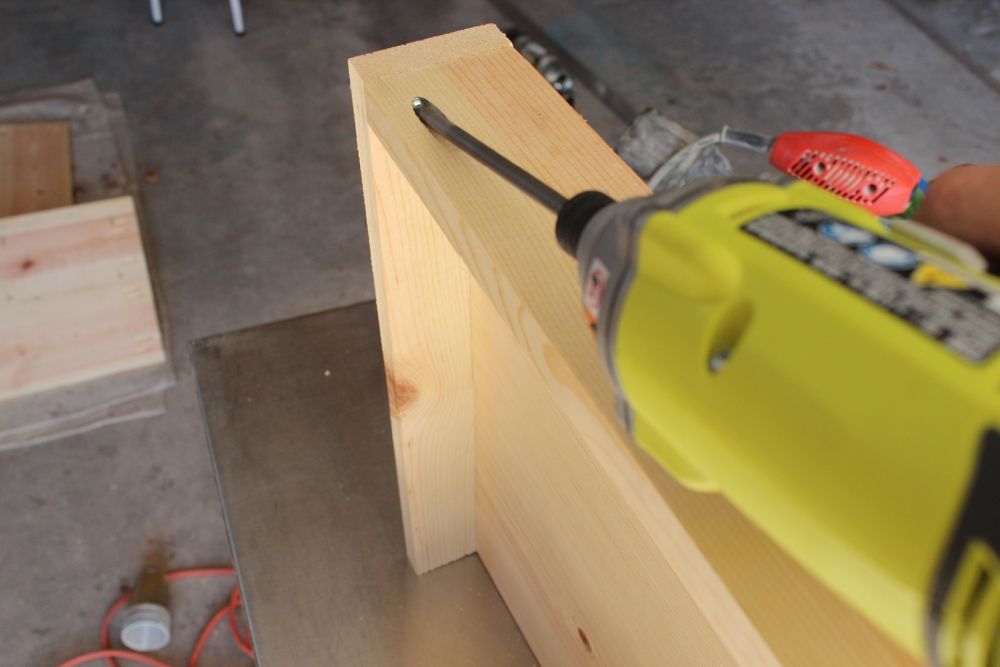
Drill four pocket holes along the long side of one board per pair.
Trying to decide what to put on a bar cart? Look at your overall home’s design theme and go from there. If you have a farmhouse look, make a farmhouse bar cart and use country chic decor. If, on the other hand, you have a retro chic home, a more vintage bar cart decor setup will suit you.

Holding the boards along with the clamps, screw in your screws through the four pocket holes.

Part 5: Add Wooden Plugs

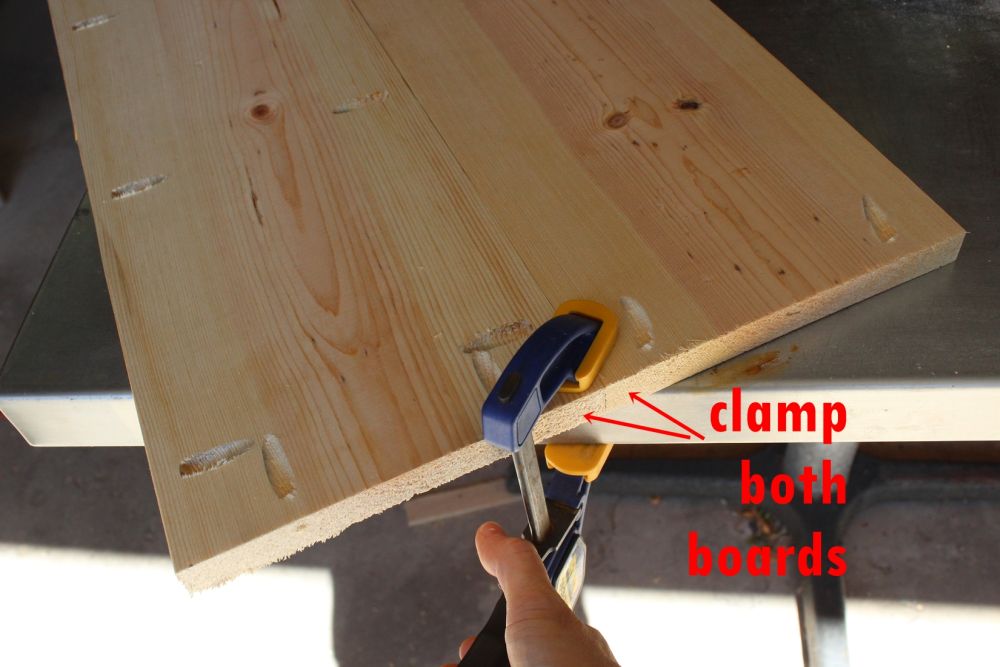
With the pocket holes facing upward, clamp the two boards together onto your work surface.

The greatest part about this industrial rolling kitchen cart is that it’s easier to build than it might seem.
Part 6: Start sanding and apply finishing to your shelves
Clamp into place using a your right-angle clamp.


Attach the boards together using your 1-1/4” screws.

Part 7: Spray paint your Mobile Bar Cart Posts

When it’s safe, flip the angle irons over and spray paint the other sides.
Place the now-drilled angle irons back onto your drop cloth, and fill the drill holes with 3/4” wood screws.
Look at this mini bar cart! With wheels, it’s ready to entertain in the home.

Pocket holes on the back wall aren’t visible from the shelf side. Repeat for the other two shelves and back “walls.”
Part 8: Drill holes into posts


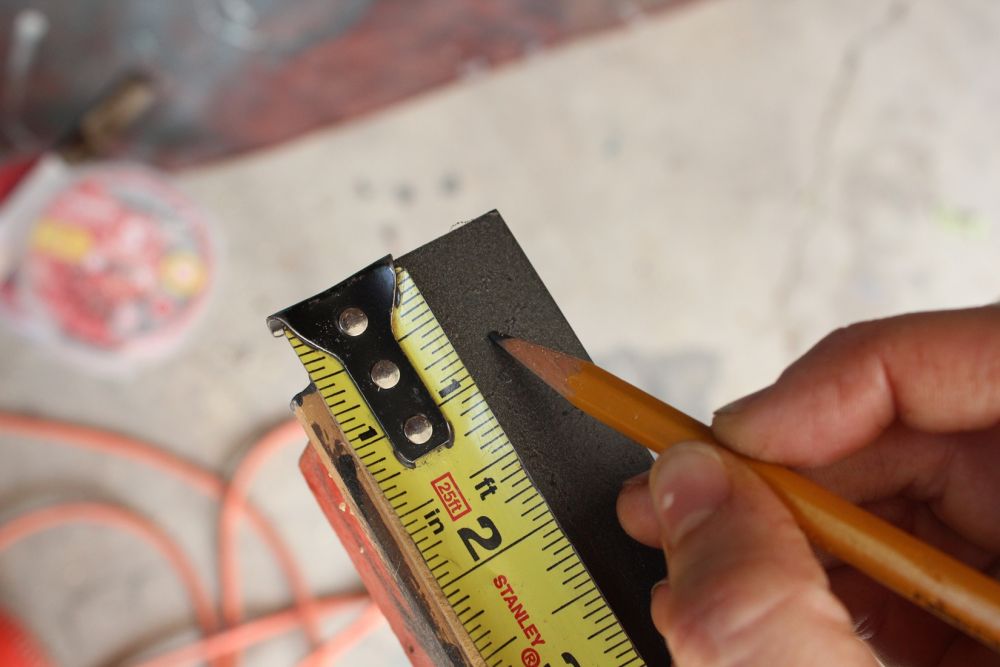
Measuring from one end, I drilled holes at these measurements.
You can increase the depth of your industrial wood rolling kitchen cart by opting for shelf pieces wider than 1×8.
Screw the 1-1/4” screws into your pocket holes to connect the side wall.
A 1×10 or even 1×12 will provide more surface area on each of your shelves.
After screwing in the first single screw on a front corner piece of the second shelf, use a level across the front of that shelf to determine placement of the single screw on the other front corner.

Note: Don’t forget to remove the right-angle clamp and screw in the final screw in that pocket hole as well.
Before you go – Don’t feel stuck to making a traditional rustic wood bar cart, you can make a modern, black bar cart that’s perfect for any contemporary spaces.
Make sure the holes are slightly off-center toward the same long side of your board.
These pocket holes will be placed on the back side of the cart.


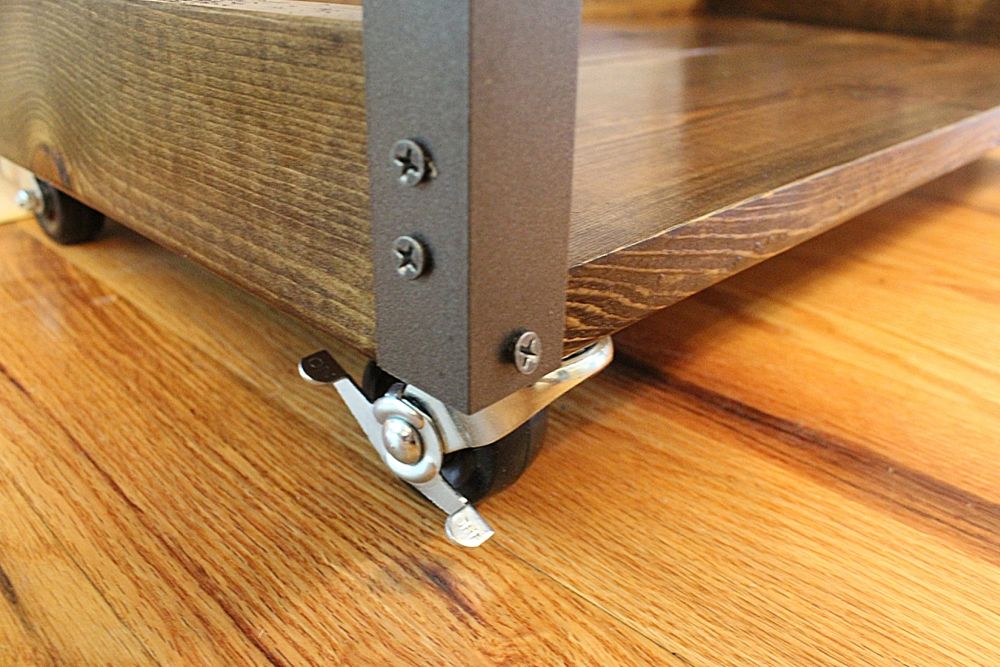
It’s now time to attach your casters.
Part 9: Assemble the 3 tier bar cart
Repeat for other side wall on this shelf.

A DIY bar cart’s biggest investment is the materials and time. However, it’ll be far sturdier than some cheap versions sourced online and you’ll have pride knowing that you made it yourself. Go to Home Depot for bar cart materials, and follow the step-by-step process above to make your own. You just need wood, wood finishes, spray paint, metal posts and a drill with screws.
Turn your shelf sideways and position it onto the edge of your shorter 1×3 so that the back wall and all connecting edges align.
There’s so many ways to decorate your bar cart. It all comes down to the overall aesthetic you’re going for within your home. You can decorate a bar cart with string lights to give it a nice touch or even use washi tape on the metal posts to give it a quirky, kid-friendly feeling.
You’ll be creating the shelf at this point by joining them together. Make sure both ends are precisely aligned.
You can eyeball this or measure it.


Take care to avoid hitting any of your pocket hole screws as you attach the casters.
Use the pocket holes on the back wall of the 1×3 board to secure the side and back walls together for added stability.
Lightly skim the tops of your screws with your spray paint, so they don’t stand out quite so much when you attach the angle iron pieces to your shelves.
Just be sure to recalculate the length of your sidewall pieces if you opt to change this measurement based upon your space and your needs.
With the angle irons painted and completely dry, it’s time to drill some holes so we can mount our shelves easily.
Part 10: Add the wheels

Lay a longer 1×3 board, pocket holes down, on your work space.

Try to keep the two outside pocket holes about 2” from the ends, then evenly space the other two holes in between.

Grab your 1-1/4” screws.

When it comes to styling the piece of furniture, knowing where you’re placing your small bar cart is key. If you’re adding it to a dining room as a coffee bar cart, for example, you’ll want to style it with mugs, canisters of coffee beans and sugar containers. Yet, if this is going to be a patio bar cart, the goal would be to use outdoor, waterproof bar cart accessories. Ultimately, knowing where and what the function is wil better serve you in decorating the furniture.
Repeat side wall steps for the other two shelves. You’re almost done with this part.
Do the same for the other side of that same board.
Additional bar cart ideas
When all the single screws are attached, follow up with the two screws on the other side of your angle iron for each corner.


To keep the boards flush and together, clamp both boards together with one clamp on each end. This will hold them together vertically and horizontally.

Repeat for two other 1×8 boards, for a total of three 1×8 pocket-holed boards (one for each shelf pairing).
Frequently Asked Questions (FAQ)FAQ
How to decorate a bar cart?
Lay your angle iron out on a drop cloth, and spray paint two or three light coats, with timing and drying according to your spray paint instructions.
How to style a bar cart?

What to put on a bar cart?
Take your longer 1×3 boards and drill two pocket holes (one on each short end) slightly off-center.
Where to buy a bar cart?
Use a level on the side walls on each side before attaching the third and fourth (back) single screws.
How to make a bar cart?
Here’s what you’re looking at at this point.
Conclusion:
I measured on only one piece of angle iron, then used those holes as guides for the other three angle irons.


