


How To Make a Large Pouf Ottoman
Want to make your own piping instead?
Leave yourself about 4” of piping, just dangling, before starting to pin the piping.
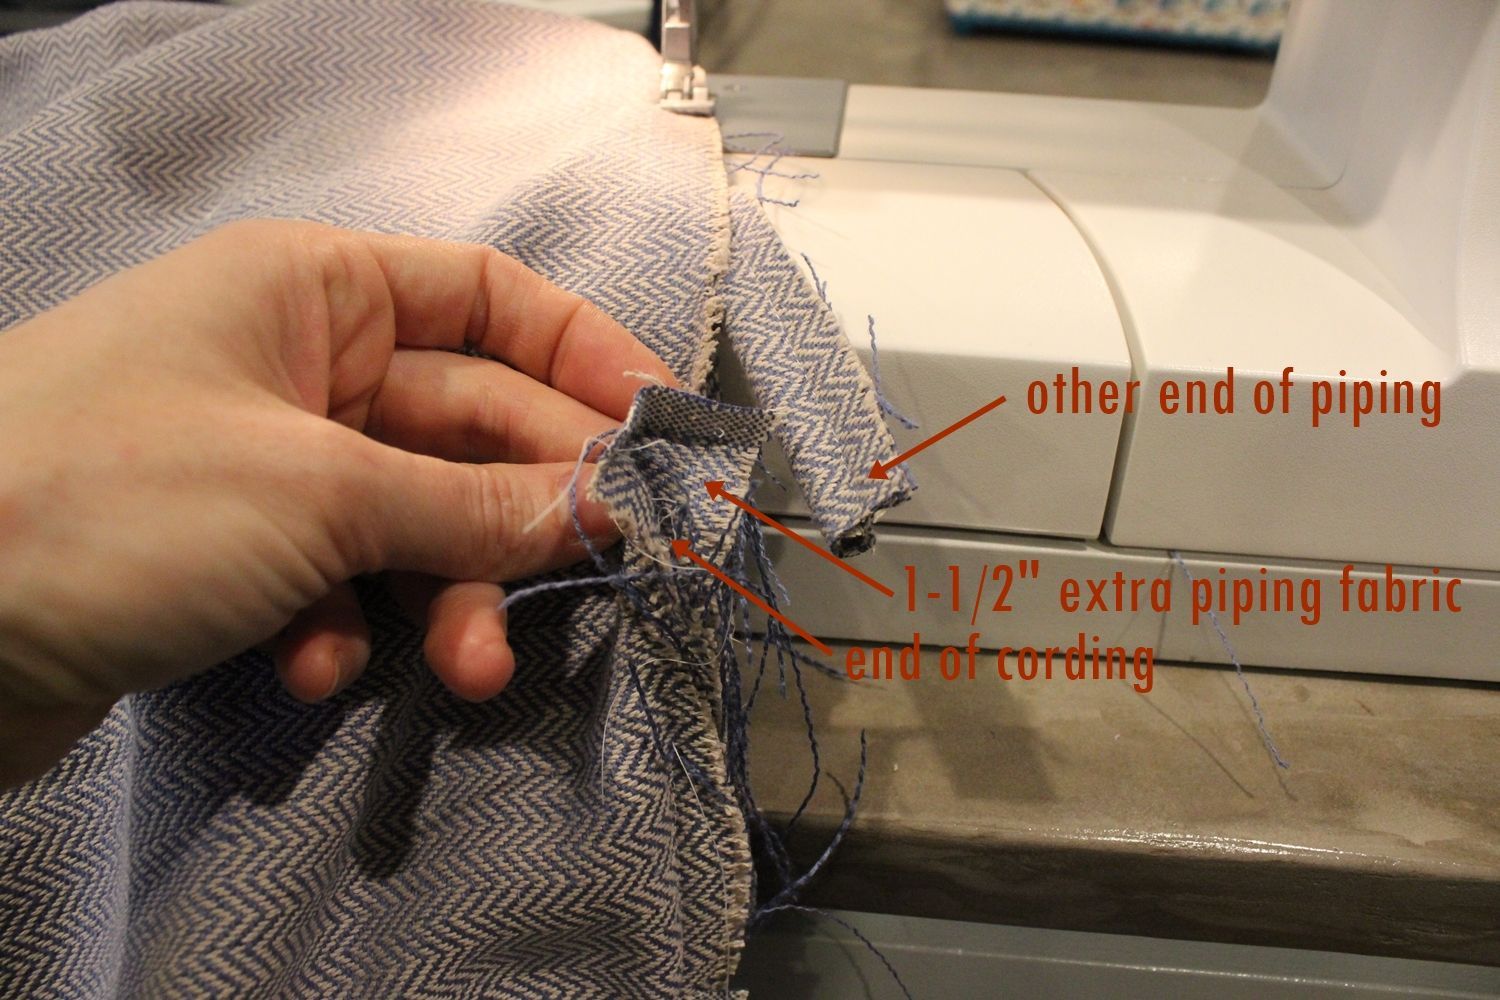
Now focus back on the cut end of the cording, with excess piping fabric. Fold down the top 1/2″ of the extra piping fabric.
Materials Needed for Square Pouf Ottoman:
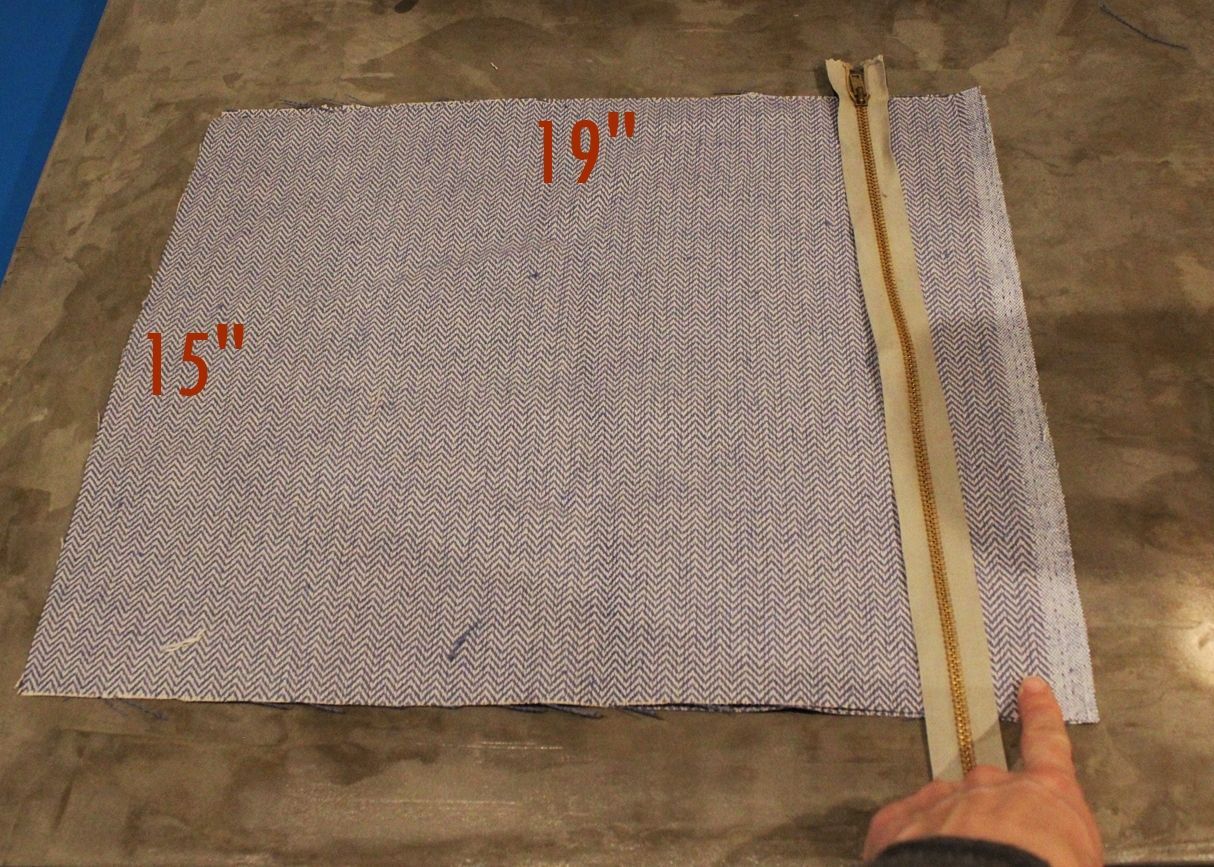
- 1-1/2 yds durable (e.g., upholstery or outdoor) fabric, cut into two (2) 19”x19” squares and four (4) 19”x15” rectangles
- 6 yds piping (brief description on how to make your own included in this tutorial)
- One (1) zipper at least 15” long
- One (1) bag of 100L polystyrene balls (or 3-4 cubic feet)
- Upholstery thread
- Iron
Step 1: Begin cutting the fabric for the pouf ottoman
Also, take care to unzip your zipper at least a little bit about halfway through sewing this side, so you can access the zipper pull and open it to flip your fabric right-side-out when it’s all the way sewn up.
Making a pouf ottoman large is pretty simple and easy! The hardest part is just deciding on the color; do you want a white pouf ottoman or a blue pouf ottoman? Also, the style; boho pouf ottoman or moroccan pouf ottoman? Once you pin down the color and style scheme, you really only have to follow a few steps with the help of a sewing machine!
Whether you want to use a pouf ottoman for sitting on or resting your feet on, this piece of furniture is a definite great addition to your home. Rather than going out and buying a generic pouf ottoman from ikea or target, you can create a custom one that lasts! Go on, and get crafting.
Curve your piping around the right angle of your 19” square (think of the curves on a race track – they’re not going to be right angles, but they’ll be close curves).
Step 2: Prep presewed piping or make your own


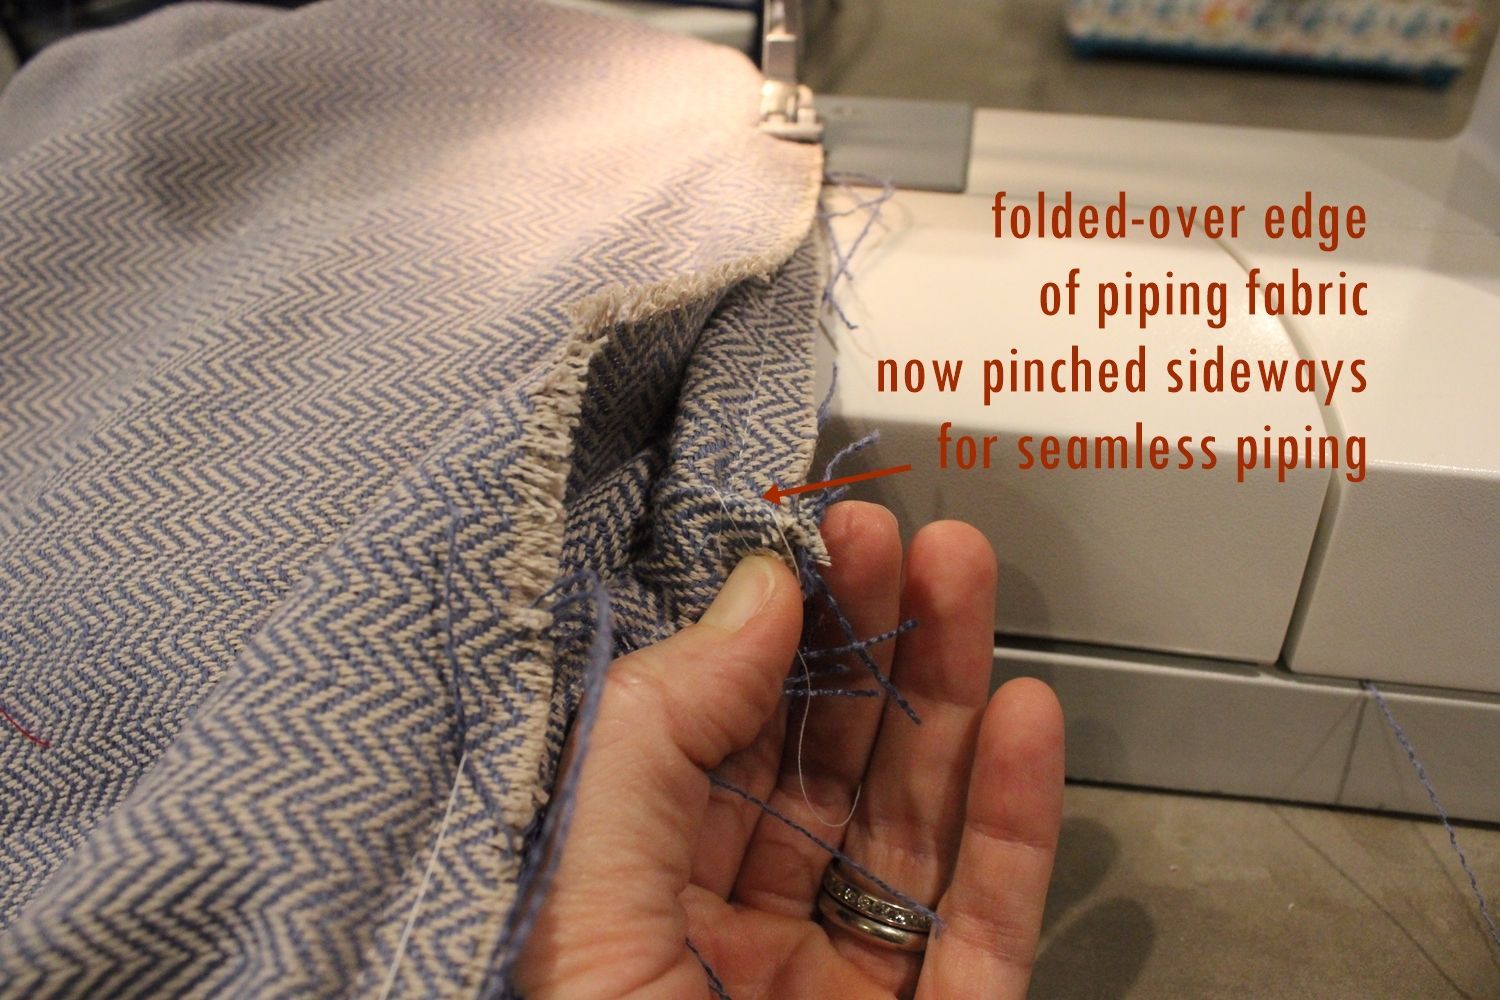
The two ends of cording should touch – not overlap or gap too much.
Pinch the raw sides of the extra piping fabric together to sandwich the other piping end inside.
Step 3: Stack fabric atop one another
Repeat piping attachment steps for the other side of your tube, using the rest of your piping and the other 19”x19” square piece.
The best material to fill a pouf with is polystyrene balls; however, you can use old pillows, blankets or even jeans!
Step 4: Begin sewing these sides together
If you find you need more or less length on a particular side, you can adjust a side seam on your tube, if necessary.

Step 5: Once sewn, iron the seam down

Lay your tube down, RIGHT side up, then lay your piping on top of the edge with the raw edges together and aligned, then grab one of your 19”x19” squares and stack, WRONG side up, on top of the piping.
Step 6: Place your zipper
If you haven’t already, begin by cutting your heavy-duty fabric.
Flip your tube right-side-out so you can see your piping.

Step 7: Pin the zipper once placed
Snip any errant frayed threads close to your seams, taking care to avoid snipping your fabric or piping.

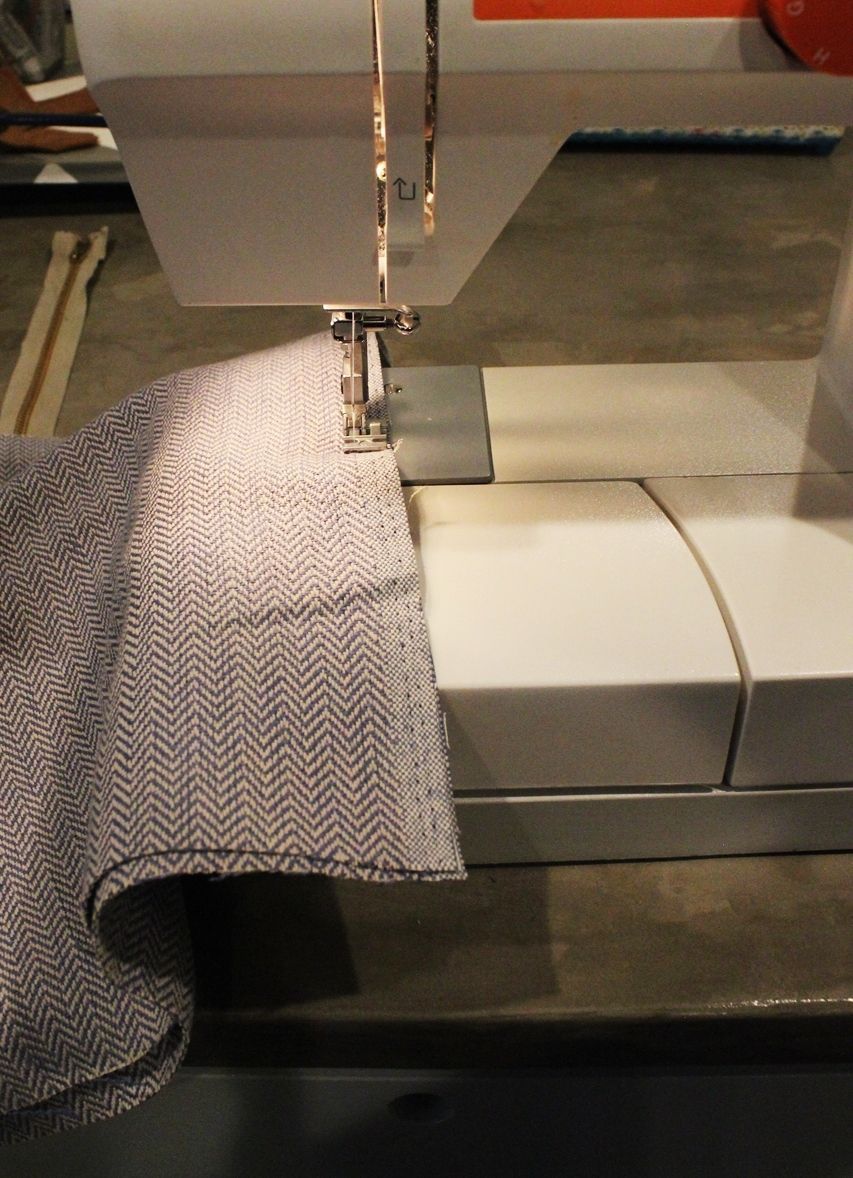
When everything looks good, run a zigzag stitch (or use your serger) all the way around the raw edges of your tube/piping/19” square seams.
Step 8: Sew your zipper to the pouf ottoman fabric
This will be the exposed edge, visible on your pouf ottoman.
Use a funnel to transfer the polystyrene balls into the fabric pouf ottoman.
Step 9: Rip the seam open
Turn it right-side-out.
Of course, one of the great things about DIY projects is their customization – you can make this any size you want, really. This size works great for our space. My family especially loves how it comfortably fits small bodies…
Step 10: Repeat steps above for the other side


DIY Level: Beginner to intermediate sewing skills
Step 11: Begin to pin together the different components
The post DIY Pouf Ottoman Cube appeared first on Homedit.

You’ll need two 19”x19” squares (these will be the top and bottom of your pouf) and four 19”x15” rectangles (these will be the sides, so make sure they align the same way if your fabric has a pattern).
Press the basted seam open with an iron.

Step 12: Work around the piping curves

This is a more detailed DIY project. To make a homemade DIY ottoman, you’d have to source fabric, base material for legs, and filling. For this reason, making a DIY pouf ottoman is the best way to go; it’s less complicated, less expensive, and more fun.
Cut off JUST the cording here; leave the piping fabric.

Step 13: Cut the cording
Lay cording (purchased at a craft/fabric store or through a local upholsterer) down the center of the WRONG side of your piping fabric, then fold so the right sides are showing and sew tightly together using your sewing machine’s zipper foot.

The pouf ottoman is one of the most versatile small-furniture pieces around. They amp up the friendliness of a space immediately and come in many shapes.
Open up your bag of polystyrene balls carefully.
Step 14: Fold the excess piping fabric
…as well as larger ones. It really is comfortable on all counts!
Yes! You can sit on a pouf ottoman as long as it is large enough to support you. They come in all sizes, so be sure to make yourself an oversized pouf ottoman to fit it.

Step 15: Insert the other end of piping
You may cut strips of the fabric of your choice about 3” wide; sew several together to make a long (about 6 yards) strip.
Pin into place, then sew together. Sew the three pieces together (tube, piping, and 19” square) all the way around the edges, minus about 4” from the beginning and 4” from the end of the piping.
When your zipper is attached, use a ripper to rip the baste seam open.
Step 16: Pinch and pin into place
Be sure to use heavy upholstery or outdoor fabric due to its durability and hardiness.

You should have a tube of sorts, with all the short (15”) sides sewn together.
Step 17: Sew raw edges

A pouf can be used as an ottoman, yes. They make excellent foot rests next to couches, or arm chairs in your living space.
Step 18: Flip inside out to see piping
Make sure raw edges are all aligned for all three components (side-tube, piping, and square), and make sure the corners of your 19” square lines up with the corner seams of the tube.
Use your sewing machine’s largest stitch (called a baste stitch) to sew one piece’s short (15”) side to the other piece’s short side.
The difference between the two is that a pouf is soft like an oversized pillow, where an ottoman is made from hard materials like wood, or plastic.
Step 19: Run a zigzag stitch around raw edges
Pin into place, all the way around (until you get to the end of the piping; just leave the last 4” for now – but DON’T cut your piping yet, just let the extra 3 yards dangle for now).
Prep your presewn piping for the next steps.
Step 20: Repeat steps for other sides of tubing

Make sure the piping is nice and taut all the way around before moving on; if it’s loose or unattached somewhere, such as a corner, simply flip it back wrong-side-out and re-sew the seams.

Be sure to keep the right sides of the tube and square piece facing each other, and the piping sandwiched in between.
Step 21: Snip away frayed threads
Pin zipper into place.

Step 22: Securely open polystyrene ball bag
Note: Unless you’re using a heavy duty zipper (above), be sure to keep your zipper fully closed. It’ll be much easier to sew this way.
Sew up the raw edges like it’s regular piping under there.
Step 23: Fill the oversized pouf ottoman
Insert the other end of piping into the extra piping fabric (that extra piping fabric will be kind of like a hard taco shell for the other piping end).
Pin the now-seamless piping ends into place with your tube and 19” square piece.

Your zipper pull should only be about 1/2″ down from the top of the seam-edge.
Step 24: Plump the floor pouf ottoman up and enjoy!
Pull the other end of your piping past the piping fabric’s edge, up to the cut end of the cording itself, and cut the piping so that it will just exactly touch the cut end of the cording.
This step-by-step guide will demonstrate how to make your very own DIY pouf ottoman cube including tips and tricks to make it a breeze.
With the RIGHT sides facing down, place your zipper face-down so the zipper itself lies directly on the seam.
Shake your pouf every so often to settle the balls; you can fit more into your pouf ottoman than you might first think.
Plump it out the way you like it. The zipper probably won’t get used a lot, but it’s nice to have so that you can refill polystyrene balls as needed over time.
You did it! You made your very own DIY pouf ottoman cube.
Leftover? Try this DIY kids bean bag chair.
Grab your other two side pieces (19”x15”) and, placing right sides together, sew the short sides together and then to the two zipper side pieces.
Frequently Asked Questions (FAQ)FAQ
How to make a pouf ottoman?
This DIY pouf ottoman is a wonderful addition to the form and function of your space, whether it’s a bedroom or living room or home office.
What do you fill a pouf with?
Remember how you left the piping start and end dangling about 4” out? We’re going to finish up the piping before you complete the seam. Pull one end of your piping fabric down so about 1-1/2” of cording is exposed.
Can you sit on a pouf ottoman?
Then have your tube seam split ever so slightly (like 1/2″ in) to follow the curve of the piping.
What is the standard size of an ottoman?
Use your zipper foot to carefully sew the zipper into place.
Can a pouf be used as an ottoman?

What is the difference between a pouf and an ottoman?

How do you make a homemade ottoman?
Take two of your side pieces (19”x15”) and lay them on top of each other, RIGHT sides in.
Conclusion:
The standard size of an ottoman is between 13”-20” in height.
