Instead, stick to half or less. Here you have a good visual of how everything looks after the holes are drilled. You can drill as few or as many holes as you want as long as there is more wood than there are holes.
Getting your pot rack to hang right is the most difficult part. You need to get hardware that is made for this purpose. Add one to each corner followed by chains or rope, whatever you will use to hang the rack.


How to build a hanging pot rack: step by step tutorial
Step 1: Learning The Miter Joint For The Hanging Pot Rack


A hanging pot rack can be a wonderful weekend project. Woodworking projects can be fun and fulfilling. Some of the best projects you can make involve wood. Woodworking is productive and therapeutic.
You can buy bolts with round heads or you can square off normally round holes with a file. There are a lot of possibilities that will allow a good fit for your corner plates which make the entire rack look so much better.
Step 2: Fitting The joint


Step 3: Create Mortises

There are many ways to make mortises with power tools, but if all you have is a drill, you can still do it. For this project, we drilled three holes in the first board and then chipped away until we had three perfect squares.
This job can be customized with a spokeshave. A spokeshave is a tool used for shaving wood. Its method is ancient and has been used for centuries, likely millennia to shave wood and carve it to perfection.
Step 4: Cut The Tenon Joints
The full project is available here.
The miter joint is one of the most important you can learn because you can use it time and time again. It can be used to secure almost anything that is wood. Most furniture companies use it for frames.
Just adjust the rope, hardware, and wood to fit the design style of the kitchen in question. Darker woods are more modern, faded woods are more beachy, and so on. Get creative and create your masterpiece.
Step 5: Dry Fit Everything

In reality, you can’t buy a pot rack this nice from a store like that without paying nearly a thousand dollars or more. So count yourself lucky if you have the skills to build something like this. It’s truly a gift.
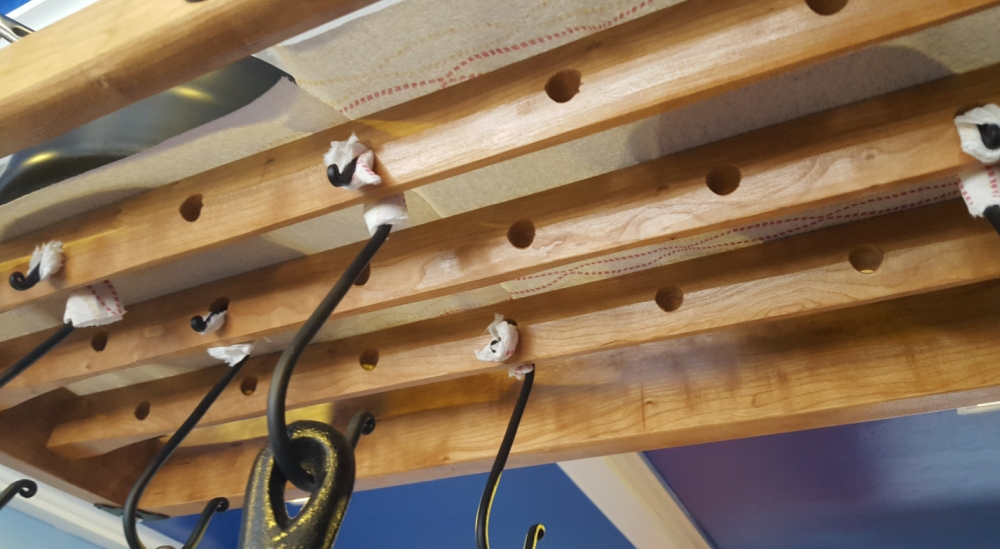
You also need hooks to hang the pots. Double-ended hooks are what you want. You may need to cushion the hooks on top by adding foam or cloth. This will keep things safe, secure, and lasting a lifetime.
Step 6: Slim Down The Rails
Today, we are making a hanging pot rack. For this project, we aren’t referring to a hanging potted plant or some sort of illegal activity. Today, we’re talking about a rack that you can hang pots and pans on.
You need to make sure that the end result is a nearly perfect square or rectangle. If it doesn’t fit, find out what is keeping it from being symmetrical. You may need to cut the ends off of two of the boards and adjust them.

After this, it’s all about making things work and making things look good. But this is the base of your rack and you can use the techniques you learned up until down to build almost any type of furniture.
Now you want to cut the tenon joints will are the parts of the boards that go into the mortises. The tenon joints are essentially a narrower version of the full board. So you can start by doing this one of two ways.
Step 7: Drill Holes
The rails here are the parts of the rack that the pots will hang on. The rails in this case were one-inch thick. To give them a slimmer and more sophisticated look, we tapered them down. This also allowed for hooks inside the

It’s very important that everything is safe. So use tools designed to test load-bearing qualities before gifting any pot rack you make yourself. Add as many load-bearing additions as possible to spread the weight distribution out.
After you glue the entire thing and it dries, it’s time to seal. You can use almost any sealer that you want. In this case, shellac was used for the first coat. Then polyethylene was used which is the most common sealer for wood.
Step 8: Glue The Hanging Pot Rack Frame Together
A hanging pot rack that you can use to hang pots frees up so much space in your kitchen and adds an amazing design quality. You can go both rustic and contemporary with such a rack and it always looks so good too!
Making something like this is rewarding when you are doing it for yourself. But it’s even more rewarding when you do it for someone else. This makes a great gift for any family and it fits most design styles.
Since the accent pieces are for looks alone, you shouldn’t need to add bolts. Just screws will do. You can add any type of accent piece you want but getting a set to match will look best. Dark looks exceptionally well with the wood.
The post How To Build A Gorgeous Hanging Pot Rack appeared first on Homedit.
Step 9: Attach Brackets

Learning about wood joints is very important if you are getting into woodworking. So, learn about the different types of wood joints before you get started and learn along the way. Don’t worry if you can’t memorize them.
Before you even think about gluing, you need to make sure everything fits. So if you measure at least twice every cut and made plans before you started, everything should fit nicely. This is the majority of your rack.
Here comes the fun part. It’s time to glue everything together. Do one last dry fit then take it apart and glue it together piece by piece. Let the entire thing dry for a little longer than the wood glue bottle says.
Step 10: Attach Corner Plates
It’s very important to learn to cut a miter bridle joint with a miter saw for this project. The outside for these joints is mitered while the inside is bridled. For this project, only the outer boards will bear and loads.

It’s important to create a slot for the brackets to fit nicely. Adding it on top not only won’t look as good, but it is harder to cover and it won’t offer as much support. We need backup support aside from the screws.

Step 11: Add Accent Pieces To The Hanging Pot Rack
However, everything has its limits. So have a set number that should not be exceeded. You don’t need to write the amount down on the rack but it is a good idea to tell the owners a good range to keep the weight at.
A mortise is, “a hole or recess cut into a part which is designed to receive a corresponding projection (a tenon) on another part so as to join or lock the parts together.” That’s what we will use for this project to secure the boards.


Step 12: Finishing Up the hanging pot rack


This is optional but if you are adding heavy pots then you want to strengthen the joints. You can do this by adding metal brackets. Don’t worry, if you don’t like the look of the brackets we will cover them later.
After the rails are carved, then you can begin drilling the holes for the pots to hang on. You want to make sure you don’t drill holes that are more than half the width of the rails or else it will put the structural integrity at risk.
The Load-Bearing Process

When you attach the bolts, you will see the transformation. So drill the holes, make sure everything will line up, and then install the corner plates. Get creative with this process because it’s primarily for looks.
You can either cut in a quarter of an inch or you can cut down an inch. The exact measurement depends on how big the boards you use for your rack are. You just want the tenon to fit into the miter perfectly.
If everything holds up well, you can also add plates to the top that can support heavy pots and pans that won’t hang. This doubles the amount that any pot rack will hold, freeing up so much space elsewhere.

Enjoy the hanging pot rack!
Note: one-inch boards are great for rails because they aren’t too bulky but they are thick enough to hold up. Don’t go thinner than this if you plan on them holding up pots but too much thicker and the rack itself may be too heavy.
When finished, the miter bridle joint should create a perfect fit. If they don’t, you can assemble them together and saw the ends of the joint off. This gives a new flat surface to work with but you need to be careful.
This can be one of the best parts. You get to choose hardware and accents that will turn your project into something that looks nice yet homemade into something that looks like you bought it at IKEA or Wayfair.

