Your mirror lines should look like this – if it does, your gem mirror is off to a great start!

Mark on the very top edge of your mirror, because this is the point you’ll be aiming for as you create your diagonal lines (for the angled octagon sides).
FAQ
How to hang a heavy mirror
Tip: There is a small gap between the edge of your tool and the scoring wheel, so if you lay your ruler down first, your scored line will be about 1/16” off your marked line. Holding the ruler securely, run your scoring tool from one end of the mirror to the other, being careful to keep the scoring tool’s tip right next to the ruler. (It has a tendency to drift away from the ruler if you’re not careful.)
How to clean a mirror
Tip: Some tiny glass shards will fall as you do this, so I recommend laying a large piece of cardboard or something underneath to catch these. (Tutorial for creating your own ombre abstract art, as reflected in this mirror, found here.)
When were mirrors invented?
You could use heavy duty 3M hanging strips to hang this mirror anywhere, or you can prop it on a shelf or mantel for all to enjoy.
How to make a mirror
Using the same cutting technique as described above (e.g., place the scoring wheel of your glass cutter on the line, then bring the ruler to your glass cutter, secure the ruler firmly with one hand, and score firmly – one time – with the other hand), cut the diagonal sides of your octagon.


Place the scoring wheel of your glass cutter on your line, then align the edge of your ruler with the outer edge of your cutter tip.

DIY Mirror Level: Intermediate
You only need to score once. Move your mirror to the edge of your worktable. Hold the mirror onto the table with one hand, then with the other hand, grip the smaller (scored) section. With one swift, strong movement, push your arm gripping the smaller section straight down toward the floor. You will hear a snap and see a straight cut right where you scored the mirror.
Materials You’ll Need to Build the Gem Mirror:
- 24” x 36” flat (non-beveled edges) mirror (Note: Actually, you can use any size of mirror you’d like. Adjust measurements shown in this tutorial accordingly.)
- Glass cutting tool
- Metal ruler
- Fine-tip permanent marker
- Razor blade (e.g., X-acto)
- Clear contact paper
- Metallic spray paint
- Fine grit sandpaper
- Gloves (optional; for working with the glass after it’s been cut)
- Clear-coat spray paint (optional; this tutorial did not use it)
How to Cut and Build a Statement Mirror Step by Step Guide
Step 1: Squaring the Mirror

Peel the contact paper.
Reflective surfaces were used in most homes dating as far back as 4000BCE. But the use of decorative mirrors came about in the 5th century.
Step 2: Scoring the Mirror
That depends on the mirror itself. If you’re working with a frameless beveled edge, then you’ll need mirror clamps and a back fastener to hang it. Otherwise, most mirrors come with hanging hardware. Just make sure you anchor it to a stud for maximum support.


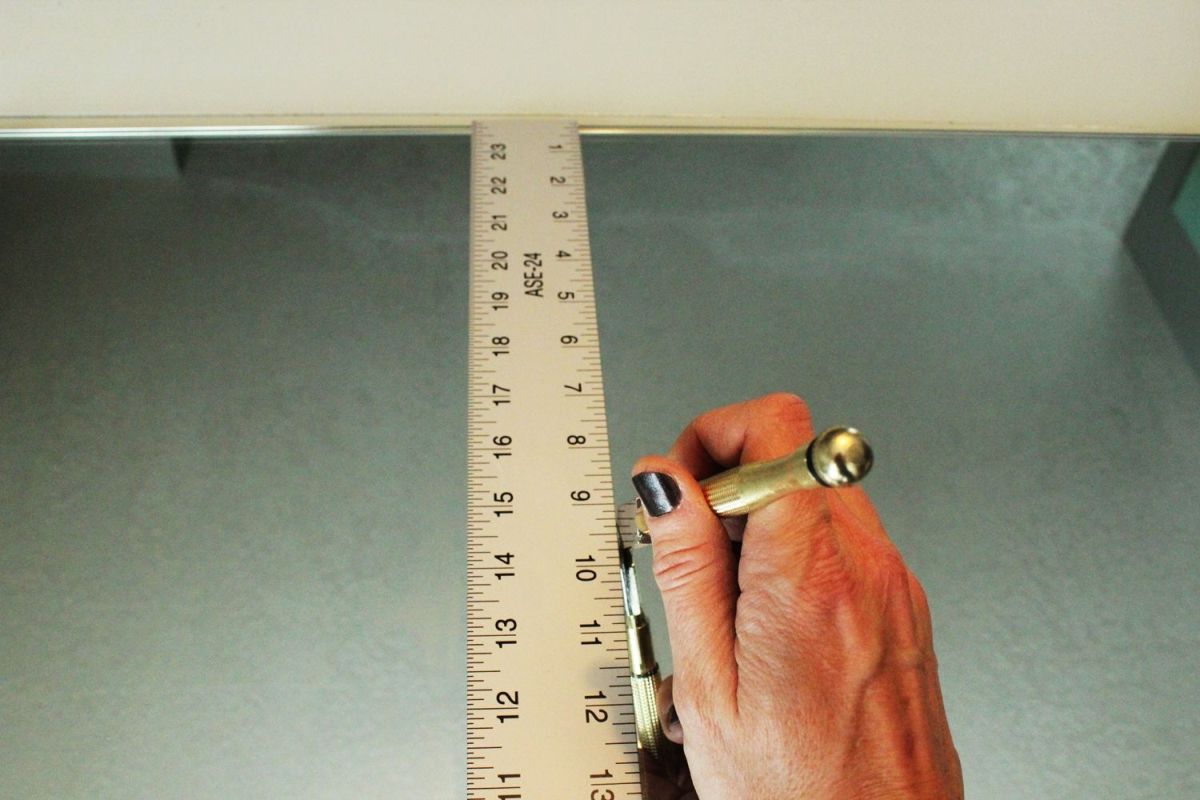
Begin by squaring off your mirror. Mark 24” on both long edges of your mirror, then draw a straight line across.

Once you’ve marked your 10” sides, draw diagonal lines across each corner. These lines should be close to 10” as well. If you find that, for some reason, they are longer or shorter than 10”, you’ll need to make slight adjustments, maybe add or subtract 1/16” if need be. Remember that each adjustment changes the length of the other sides.
Step 3: Shaping the Mirror
Related: 10 DIY Vanity Mirror Projects That Show You In A Different Light


Snap off the scored corners.
Using a drop of glass cleaner on a cloth, wipe away the line that is parallel to and directly in “front” of each of the octagon’s sides.
It even stands out in the semi-dark.
Choose the width of gem lines that you like best. This example shows about 1/4″ lines, which means I cut 1/8” off either side of the drawn lines (shown with the red marks in the photo). Use a razor blade and follow the ruler’s edge precisely to cut around each line.

You’re a perfect DIY specimen.
This gorgeous DIY mirror is a fairly straightforward project that you can do with any simple mirror, some glass cutting tools, and an afternoon. The cutting end result provides a beautiful modern geometric aesthetic that adds style and interest to any space. Not only will you learn how to cut a mirror and how to paint a mirror, but you’ll create this stunning piece for your home all by yourself!

Use glass cleaner to wash your mirror. Let it dry thoroughly. This will help make the next steps go more smoothly.
Step 4: Clean the Mirror
We love how the gem mirror looks complex, sophisticated, yet subtle.
Step 5: Marking for Smaller Pieces
Congratulations! You’re done with all the lines. It’s not time to prep your mirror for painting. Cover it carefully with clear contact paper.

Remember when I mentioned that wherever you have seams in your contact paper, the paint will leak a bit? That happened here. Notice all the red arrows. It’s not a big deal, though.


Mirrors are a great tool for increasing light in any space.


We hope you enjoy creating your gem mirror as much as you love displaying it!
Step 6: Final Markings
With all line and edge strips removed and the lines (and triangular bits) all wiped away, lightly sand the edges of your mirror to remove any and all sharp spots. Use a fine grit sandpaper (I used 220).
Tip: Use as few pieces of contact paper as possible – one solid sheet of contact paper is ideal. The seams between pieces of contact paper aren’t as crisp for painting as the single-layer ones. Any paint leaks can be taken care of, but it’s just easier with a solid contact paper layer to begin with.
One benefit of doing this step is that it also clears away any tiny triangle pieces of contact paper that you may have missed in your original removal of the line strips. If you didn’t miss any bits, congratulations.


Step 7: Prep Mirror for Painting
Such a chic, unique piece. And you made it yourself! You should feel proud.

(For your reference, or if your brain works this way, you’re wiping away the center part of each side of your two original squares that you drew at the beginning.)

Step 8: Marking Your Gem Lines

Related: 20 DIY Mirror Projects That Are Fun And Easy To Make
The post How To Cut A Mirror And Turn It Into A Gem Statement appeared first on Homedit.
It’s such a showstopper that you could easily position it above your mantel, which is typically a focal point of the living room, and it would be a gorgeous feature piece…that you made yourself…on a small budget. So, read on to see how we made this DIY mirror design and also how to hang a mirror properly.
You can use Windex or glass cleaner and a dry microfiber cloth. Spray the cloth first, then wipe the surface.

Tip: Don’t wipe from one corner to another, as your first corner might pull up. Make two passes, both starting in the center and wiping outward.
And with that, you’re done! It’s a beautiful decorative mirror! You can place it on a mantle or shelf, or hang it. Just make sure you know how to hang a mirror of this weight with proper fastenings.

Step 9: Wipe the Surface of Dust


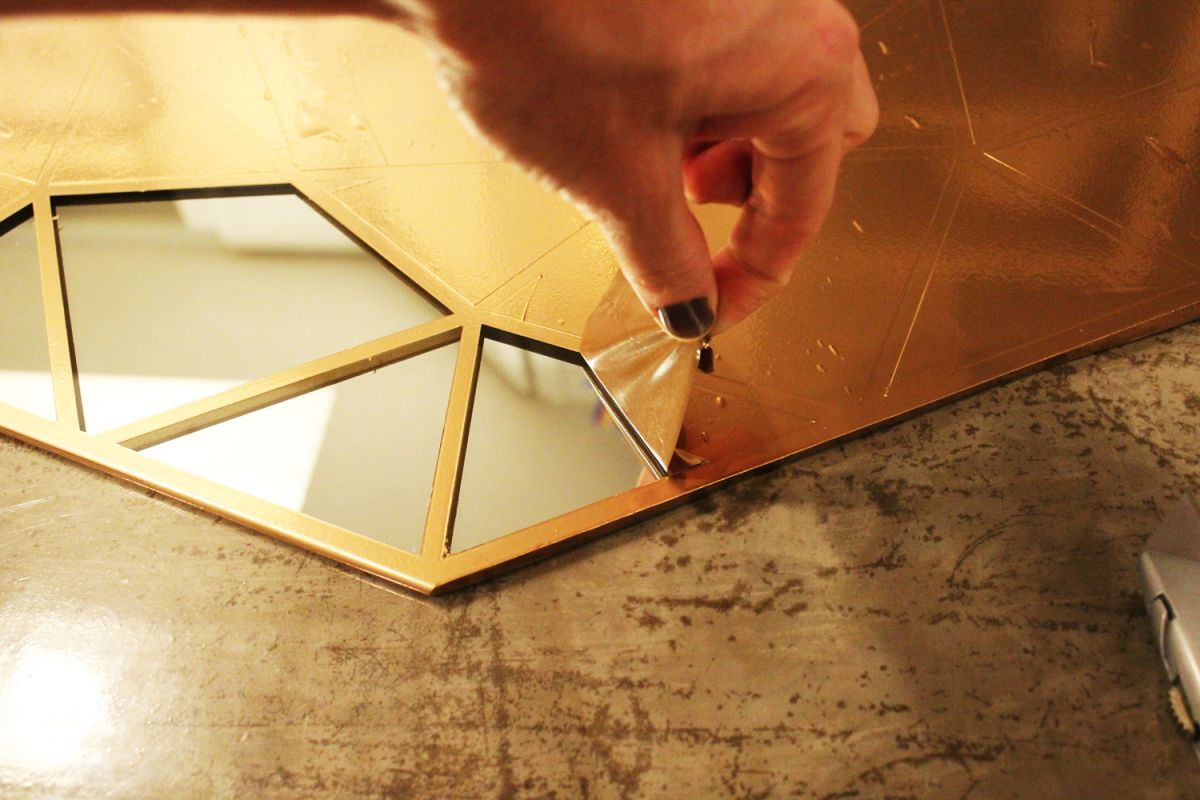
Use the tip of your razor blade and peel up the corners of your contact paper. (Hey, if you like these concrete countertops in the background, check out how to DIY them yourself here.)


Note: The author is an experienced, although not professional, DIY enthusiast. Neither the author nor Homedit is responsible for any injury or damage caused as a result of following this tutorial.
Step 10: Sand the Rough Edges
Whatever the width of your line strip cuts, use this same width to cut the contact paper along all eight sides of your octagon. So, even though I was cutting 1/8” on either side of my lines, I cut a full 1/4″ from the octagon sides. Peel these edge strips away.


Step 11: Paint Your Mirror


Tip: Use a sharp, or new, razor blade. You don’t have to press hard at all if your blade is sharp – you’re not trying to score the mirror anymore!
Simply use the tip of your razor blade to scrape the smudges away. You don’t have to press hard – a light scraping will suffice.
Step 12: Peel Away Contact Paper
A little modern geometric vibe amidst traditional décor.


Peel away your strip of contact paper. Continue for all gem lines. I found this step highly therapeutic.

Step 13: Scrap the Mistakes Off Your Decorative Mirror
Draw a short line from each octagon corner to the intersection directly in “front” of it.
Use the razor blade’s point to lift the end of your strip.

Whether or not you have glass-cutting experience, you can do this one. Ready to create your own gem mirror? Here’s how.
Now that your mirror is square, it’s time to turn it into an octagon. For a 24” square, each side of the octagon will be just slightly less than 10” – so slightly, in fact, that I simply measured 10” sections in the exact middle of each side of the mirror by centering my 24” metal ruler and marking at the 7” and 17” positions.
After the centers are marked, connect every other center point with a straight line. This will actually create two squares within your octagon (the A and B squares in the photo).

It’s time to start marking the lines that will create the jewel effect on your gem mirror. First, mark the very center of each of the eight sides.
It’s exciting, isn’t it? Looking good!
You may or may not run into a case where a snapped edge doesn’t break perfectly perpendicular to the mirror’s surface. I was concerned about this, but as it turns out, it’s hardly noticeable after you sand and paint.
Tip: Rather than measuring half the side length (e.g., 5”) from one corner, which can create an off-center mark if your sides are not all exactly perfectly the same, do this instead: center your ruler between two numbers (in this case, I used the 5” and 15” marks) and mark the center in this way.

This next step is optional. Because you will be painting over your exposed lines, you would be fine leaving them. However, I like to start with a clean surface whenever possible, so I wiped them clean. Again, put a drop of glass cleaner on your glass cleaning cloth, and wipe them, from the center of the line toward the corners.

You can’t make the glass itself, not without some serious equipment. But You can take a plain mirror like the one in his tutorial and turn it into a decorative mirror with a few DIY steps.
Tip: Use a fine-tip black permanent marker; it will wash off your mirror easily. The washable marker shown in this photo was difficult to see, so I immediately switched it out for a black permanent one.
What a gorgeous “tool.”

Now it’s time to “draw” two more squares in the center of everything. Connect every other intersection that is in “front” of each octagon outer corner (these are the intersections you just drew your short lines to). This will form the red and blue squares as seen in the photo.

Make light passes with the spray paint; two light coats will probably be fine. Don’t forget to spray the sides of your mirror as well. Let the spray paint dry thoroughly.
Carefully wipe your mirror clean from your sanding – take care not to inadvertently peel up any contact paper corners. Place your mirror on a drop cloth and spray paint it. I used Krylon’s foil metallic spray paint in copper.

