
You can also use this tutorial as inspiration and not follow it exactly. It may be easy and you may want something more complex. But don’t feel bad if you want to practice before going for the real thing either!
Now it’s time to “grout” the joints of the pavers. You will use some type of sand, preferably poly-sand which is a type of sand used especially for this purpose. Apply at a 45-degree angle and make sure to let the sand sink down.

Paver Stone Patio Tutorial
Now it feels like the fun really begins. For best results, rent heavy equipment. Bobcats are easy to work with if you can drive a stick shift. You will want to dig down six or seven inches plus the depth of your pavers.


Paver stone patio – step by step tutorial
Step 1: Mark The Area
When you begin to lay pavers, start by doing the outline. This will help you make sure everything is straight and give you a guideline to work with. Because it is important that the edges are straight.
If you have a serpentine pattern and are worried it isn’t even then this is the moment of truth as well. Take it one block at a time and correct any mistakes as you go. This is always the best idea no matter what the project.
This is useful later but it also makes it easier to guide the pavers and keep things straight. Now, this shouldn’t be your first outdoor project but if you have a little experience then it isn’t any harder than creating a Lego house.
Step 2: Mark Pathway

This diy paver patio tutorial will teach you how to build a paver patio with fire pit. This paver patio installation guide costs a fraction of the price that many others do. The entire project was done for under ,000.
There is no better way to transform a landscape than with some hardscaping. Patios, paver patios, are one of the most useful hardscaping projects too! So don’t hesitate to start your paver patio project today!
Step 3: Excavate


Step 4: Create Paver Base
Even though you aren’t cutting wood or anything, you still want your measurements to work. Make sure the corners are 90-degrees or at whatever degree angle that you had planned. After you’re sure they are correct, measure them one more time.

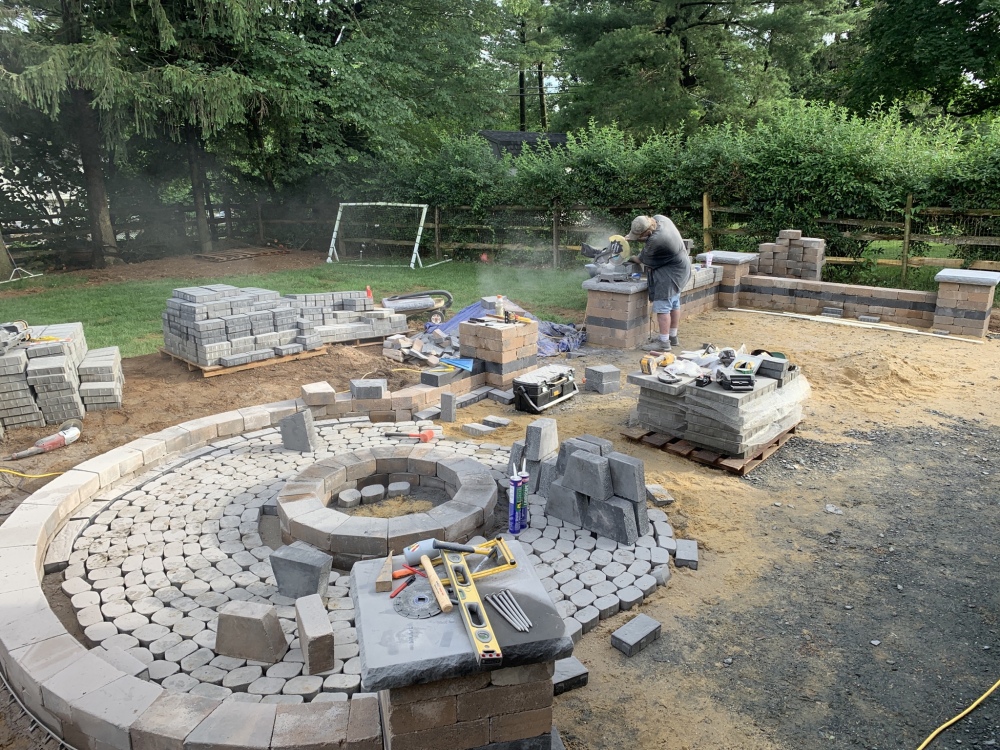
Those with diamond blades can cut fast, smooth, and accurately. Wet tile saws also work wonders. Just find something that cuts the pavers that you are using the way that you want them cut. If you’re lucky, you only have straight cuts.
Step 5: Tamp It Down
Project from BmoreCostello.

The second thing you want to do is mark the pathway if you have one. If the pathway is straight then this is very easy. Just make sure it is at least three feet wide. For this project, we see a 5’x33’ serpentine pathway.
Paver Stone Patio Steps 5-10
Step 6: Check Everything
That’s why it’s a good idea to go gentle but still keep a few extra pavers on hand for mistakes. Never get the exact amount of pavers you need. Always have extra ready for mistakes because no one is perfect.

Cutting pavers is one of the worst parts of paving a patio. It is possible to cut the pavers with a grinder but this can be hard to use and stay accurate. A better option is some type of saw, like a miter saw.
Step 7: Add Sand
Tamping is important at this step too. It may be as important as tamping the gravel. Just do this carefully, especially if the pavers you have are thin. If there is a rock or uneven ground, you could crack the pavers.
If the slope changes, you’ll need to work with it to keep it. A good technique is to add an inch or two of gravel at a time and tamp it down. This keeps things super compact and helps you keep that slope!
Have you ever wanted to create your very own paver stone patio? Well, it turns out, a backyard paver patio installation isn’t as overwhelming as it may seem.
Tip: Measuring Circles
This guide will take you through the detailed steps of how to build a patio out of paver stones. The pictures will help you follow along if you wish or learn what you can before you even start your project.
Circle cuts can be difficult and take practice. It’s a good idea to use a cheap board or tile to find out how to create a circle cut. It may take some time to master so you may need to hire someone for this part.
Step 8: Cut The Pavers
About 00 of that was spent on materials and the rest on labor and rentals. So if you have your own equipment, you can replicate this patio for under ,000. Less if you are building a smaller patio or get blocks on sale.
The post Paver Stone Patio Tutorial For Beginners To Intermediates appeared first on Homedit.
This is just like grouting tile so if you’ve done that then you know how this works. Don’t worry about any that gets on top of the tile. You will spray it all down anyway which will help the grout set and become stable.
Step 9: Edge First
For a serpentine pathway, you just need to make sure that the path is the same width the entire way through. There are more advanced techniques but this is the easiest way for beginners to get an even path.
This is a good time to take the time to make sure everything is right. Go over your measurements again. Make sure everything is square. And of course, check that slope again. Without it, your house will end up with water damage.
There is no easy way to measure circles, but it can be done. Start by finding the exact center of where you want the circle to be. Stake a string to that point. Then, pull the string taught and pull it in a circle.
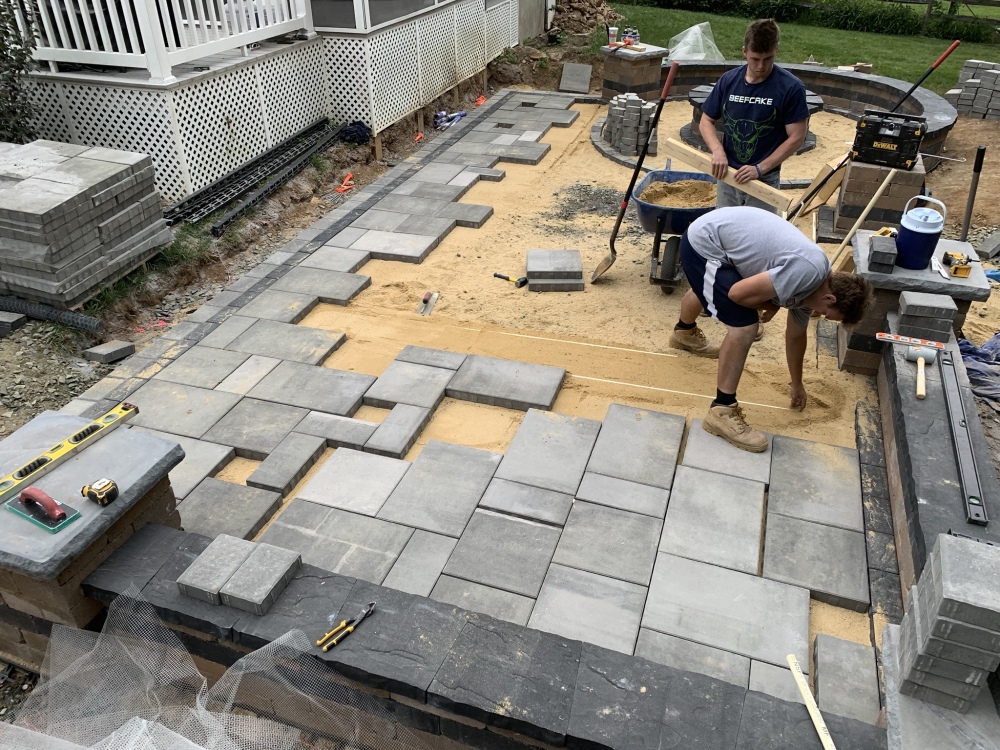
Step 10: Lay Pavers
This particular patio was 16’x30’. So it was first marked and wet down. It is very important to measure the area multiple times before you start moving anything or digging down. You want the lines to be exact.
After you get the outline ready, then you can begin with the rest of the pavers. Try to lay the pavers correctly the first time because some pavers are very heavy. You may even need to get someone to help out.

Paver Stone Patio Steps 11-14
Step 11: Pave The Walkway
Creating a paver base is easy. You just need gravel. Crushed stone or limestone gravel works well. It should be a few inches thick. For this base, the side near the house is six inches and the other side is four inches.
After you pave the patio you can begin paving the walkway. This is a little more difficult. You can start with the outline but you may need to find a different pattern to lay them down than you did with the patio.
Start at one corner and work in a stairstep pattern. You can also work in a K-pattern which is very similar. Just plan out how you are going to lay them and leave a tiny space between each of them for a traditional look.
Step 12: Tamp The Paver Stone Patio Down
This will help keep things level the whole way. Pat the sand down with a long and flat tool. You can do it all at once or you can do the sand a little at a time as you lay pavers so you don’t mess up the sand.

Pavers need an inch of sand underneath them if they’re to stay solid and steady. So use boards or PVC pipes to create an outline and fill it with sand. You can also add one-inch PVC pipes to the center as well.
Step 13: Fill Joints
Now it depends on your state and region, but most of the time, a minimum of one inch per ten-foot. This can be done by measuring the distance from the top of the gravel to the ground level. Never skip the slope!

Step 14: Enjoy Your Paver Stone Patio!
Tamping it down cannot be skipped unless you want to end up with a lot of trouble down the road. Now, tamping involves flattening the gravel down and making sure everything is compact. Just don’t get rid of the slope.


After you wet the area down, then you are ready to enjoy your patio! This one is a paver patio with fire pit which is more difficult to make but definitely worth it. There are also retaining walls that were added beforehand.
Don’t skip this step just because it isn’t necessary. Because checking everything every few steps is so important. And after this step, th9ings get more and more permanent and cannot be changed so easily.
For example, if your pavers are four inches then you want to dig down at least ten inches, probably more. If you want your pavers to come up out of the ground then you want to take those extra inches into account.
