In order to actually be able to hang this wooden bead decoration up on a wall you also need to make a hanger for it. Use another piece of yarn for this. Wrap it around the ends of the wooden rod and secure it with knot, making it as long as you want.


Materials needed for the wood beaded project:
- wooden beads in different sizes
- 3 shades of green acrylic paints
- paint brush
- wooden rod
- yarn
- scissors
- wooden sticks/ skewers

How to craft this wooden bead wall hanging decoration:
Step 1: Select a few beads in different sizes and push the skewer through them

While you’re waiting for the paint to dry you can go ahead and prepare all the yarn strands that you’re going to need later on for this project. The design we chose features 7 strands of beads so we needed 7 double pieces of yarn. We measured and made all of them longer than they had to be just so we had some freedom and flexibility.


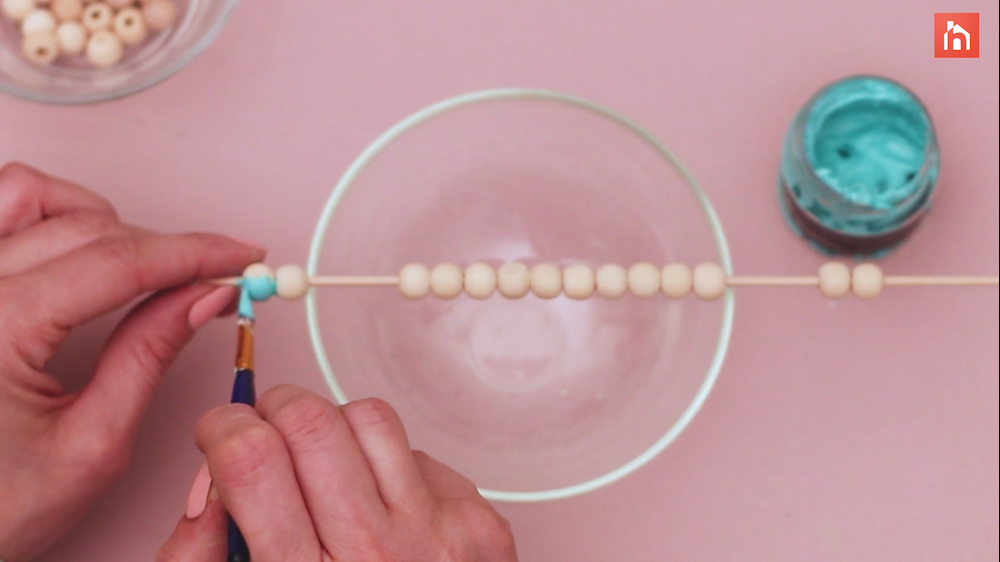
Step 2: Paint the beads light blue
There’s a lot of room for creativity and originality when it comes to wooden bead decor pieces. We’re going to explore such a project right now so check out this beaded wall hanging tutorial if you want to find out more.


Step 3: Make two more strands of small beads and paint them turquoise


Step 4: Make four more stands and paint them dark green

Now you know to push all the beads onto the yarn strands and you can repeat the same process for the rest of them. Mix and match the colors and sizes of beads however you want. We chose to have one strand of small turquoise beads on either side of the central strand and then two dark green strands on each side of those. The strands get increasingly shorter towards the edges creating a V shape.

We had a third paint color that we wanted to use for this design, a nice dark shade of green with just a hint of blue in it. These beads were meant for the shorter strands but we needed more of them since we wanted two strands of green beads on each side for a symmetrical V-shaped design.
Step 5: Measure and cut your yarn strands


If you look at our final design, you’ll see the central strand of beads is quite unique. It uses beads in four different sizes and it has a differ color than the rest. So go ahead and select the beads that you want to use for this section and push your wooden skewer through all of them. This is just so you can easily paint them all later.

Step 6: Put all the colored beads in a bowl


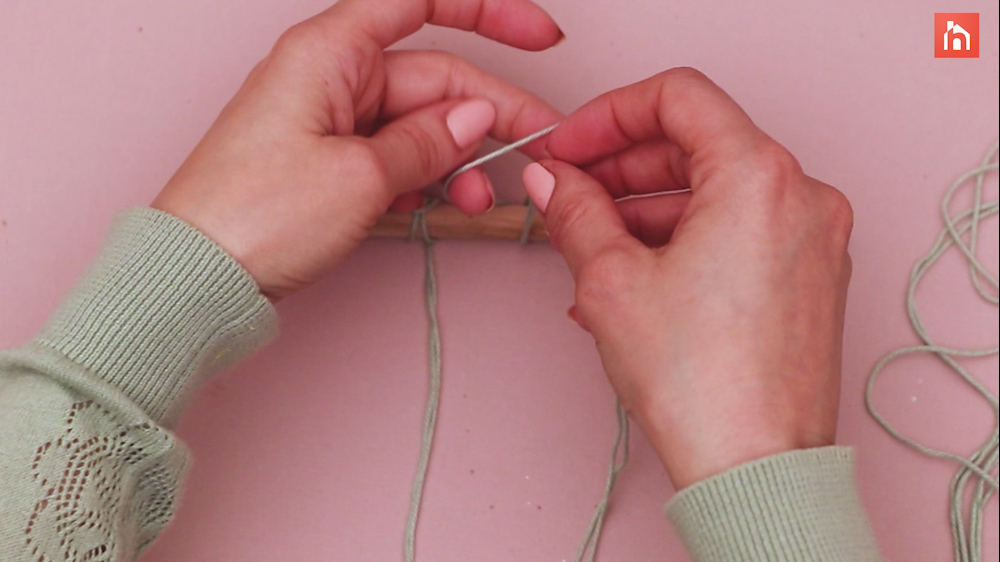
Step 7: Knot the yarn strands onto the wooden rod
The post Simple Beaded Wall Hanging Decoration In A Triangle Shape appeared first on Homedit.

Once all the beads are in place and you made all the knots, go ahead and cut off the excess yarn at the bottom of each strand. It’s up to you how short you want to leave it or whether or not you want to add more details and ornaments like tassels for example. We chose to keep the design simple.
Wooded beads may not seem like much but they’re a very versatile resource when doing all sorts of DIY projects and crafts. There’s even some projects that are specifically focused on making use of beads. A lot of them are decorations that you can put up on your walls.

Using the same technique push your wooden skewer through some small wooden beads and paint them turquoise. It doesn’t really matter how many you paint at a time as long you have enough for your end design.


Step 8: Thread the light blue beads onto the central strand


We wanted these beads to have a light blue color so we went ahead and painted them all while they were spaced out on the skewer. This is a nice and easy technique that allows you to paint the beads on all the sides without having to place them on a flat surface to dry.


Step 9: Repeat the process for the rest of the strands


Step 10: Cut off the excess yarn at the bottom


First of all, make sure you’re happy with the length of your wooden rod, dowel. Cut it to size if needed. Then take the yarn strands that you prepared earlier and loop them around the dowel one by one, making a knot at the top so they stay in place.
Step 11: Attach a yarn hanger at the top


After the paint on all the beads has dried, take all the skewers and push the beads off of them into a small bowl. This way they’ll all be in one place and it will be easier for you to grab them.


Start with the strand in the middle and use a needle threader so easily push the yarn through the needle. Then push all the beads onto the yarn in any order you want. We chose to have the biggest bead in the middle and to have the rest decrease in size from that point. When all the beads are on the yarn, make a couple of knots at the bottom to prevent them from falling off.

